Bureau API - Quick Start
Overview
In this tutorial, the process of setting up the Paygate environment for Bureau API use will be explained.
This tutorial page will explain how to perform the following actions:
- Bureau concepts and expected workflow.
- Creation of an API service account. This will be used to access the API and to control which tasks can be performed.
- Configuration of the group user settings required for Bureau API use. This will allow you to control which groups you can access and which tasks the API can perform on those submissions.
- Obtaining Authorisation settings required within the API application. Needed for secure access.
- Performing an API call to the Bureau API.
The Bureau API can be used for BACS Submissions.
As per the Paygate application, the payment API allows the creation and processing of bureau submissions, which can then be sent to BACS using the payments API.
The payment API will also allow you to monitor the progress of a submission, search the submission and payment details and download reports (see the Payments API Documentation via the Developer Portal (API Documentation > Payments API) for a full list of available API calls).
Bureau Concepts
A Bureau submission differs from the standard BACS submissions performed within Paygate in that they can be used to send multiple blocks or files, allowing money to be transferred to multiple Service User Numbers within one submission. In the Bureau API, the term block is used rather than file as the file-based workflow of a Paygate Bureau submission isn’t followed.
Terminology
- Submission - A collection of Blocks that is sent to BACS with a defined Reference, Payment Date, Contra Narrative (optional). Each submission is tied to a specific Paygate Group, and is tied to the Bureau SUN that is configured for that Paygate Group.
- Bureau Customer - The data representation of the Originating Account used for a Block. The Bureau Customer has a Service User Number (SUN), bank details (Sort Code, Account Number, Bank Reference) and contact details associated with it.
- Block - A collection of transaction records within a submission. Each Block can have it’s own Payment Date and Contra Narrative.
- Transaction Record - A record representing a Debit, Credit or Direct Debit Instruction.
Workflow
A Bureau Submission will always follow a specific workflow, in order:
- A Submission is created.
- One or more Blocks is added to the Submission.
- One or more Transaction Records is added to each block (this can be performed at point of block creation).
- The Submission is validated.
- The validated submission is persisted (Saved).
- The Saved submission is Signed.
- The Signed submission is Approved.
- The Approved submission is sent to BACS.
Once a submission has been persisted (Saved), it can no longer be edited without reopening the submission. A submission can be reopened at any point up until it is Sent to BACS.
Base URLs
There are two URLs that used, for development, it is recommended that the Test URL is used. These URLs are:
- Test : https://api.paygateservicedemo.com/bureau_publicapi/api/bacs/
- Production: https://api.paygateservice.com/bureau_publicapi/api/bacs/
This tutorial will use the test URL.
A complete list of operations can be found on the API document:
Prerequisites
To configure Paygate to use the Bureau API, you need:
Access to Paygate
A Paygate user account with the following user roles:
- Customer Administrator
- Manage Users
- Add Groups (if you are creating a new group)
- or Group Administrator group user role for the required group (if you are modifying an existing group)
Configuring the Bureau API
Step 1 - Licence
To use the Bureau API, the User will require:
- An API service account
- Bureau Licence
- Bureau API access
Service accounts and Bureau API are both licensed features.
Ensure that the Bureau API is licenced and that a service account is available.
To check the Licence, navigate to Admin > Customer > Licence within the Paygate application.
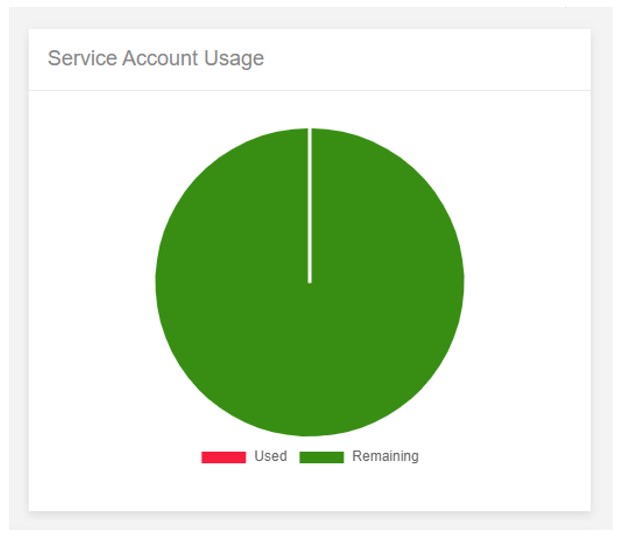
Available service accounts will be displayed within the service account Usage panel:
You can check the number of available Service User Accounts on the service account usage panel (pictured below).
Access to the payment API will be displayed within the Bureau panel of the customer licence screen:
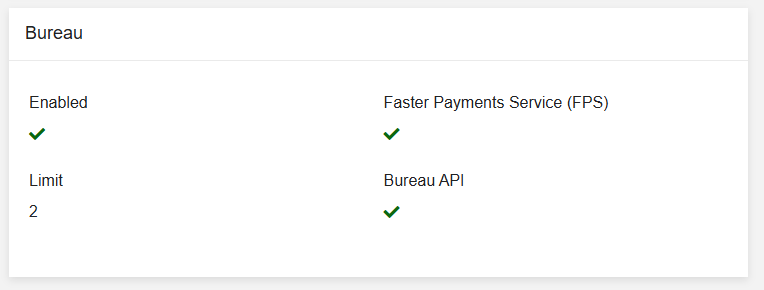
If these features are absent, please contact support, who will add the licence.
Step 2 - Service Account
The next step is to create an API service account. A service account works like a user login and allows the API to access Paygate and hence perform various functions. Just like a user account the Service Account can be granted different roles it can perform and permission to perform tasks within the submission process on a group-by-group basis.
The API service account provides an API Key which is required to establish a connection to Paygate.
Create the Service Account
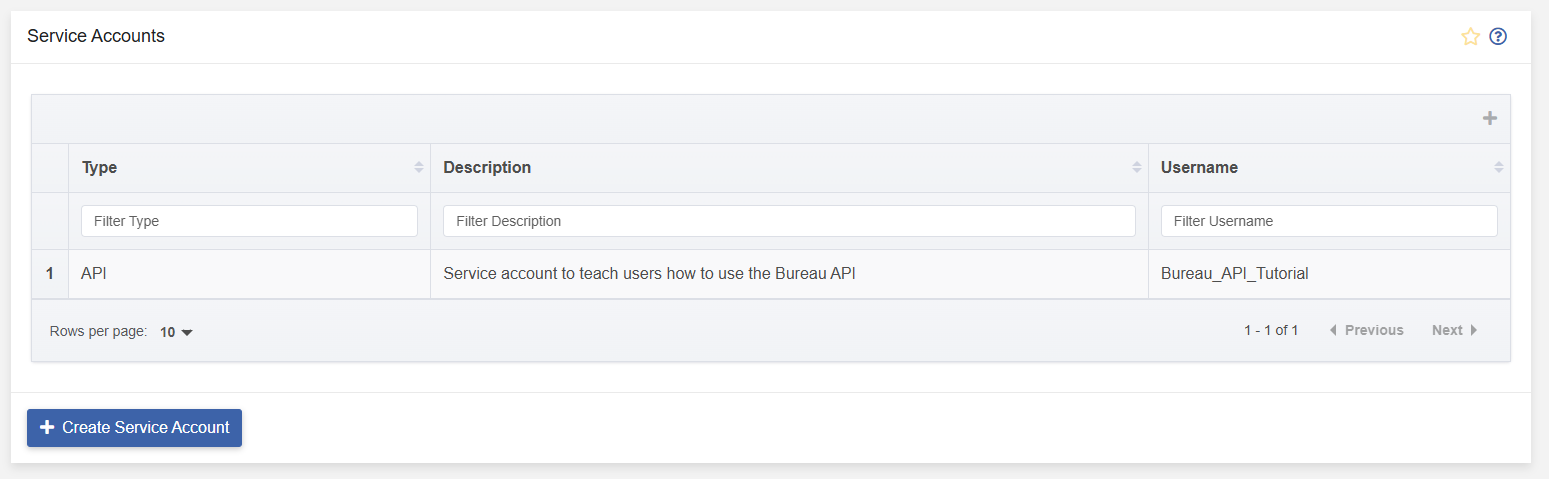
To create an API service account, navigate to Admin > Service Accounts.
A table will be displayed with any current service accounts. For new Paygate customers, this table will be empty.
Clicking on the “Create Service Account” button at the bottom of the table will present the user with a page to input the required details.
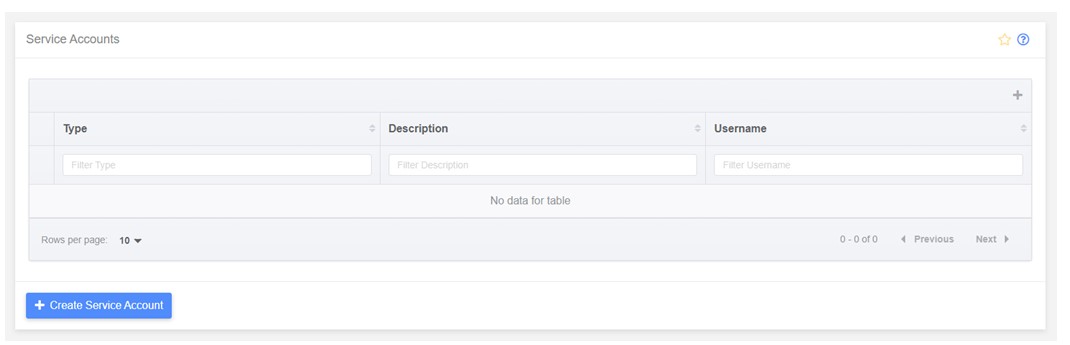
The Create Service Account page will be displayed:

Type
To create an API service account, open the “Type” selector and set to “API”.
Username
On setting the Type to API, this will then display the “Username” field.
Enter a “Username” for the service account.
N.B. The username must be alphanumeric characters and cannot contain spaces. And must be unique.
Description
Adding a Description is not mandatory but can help to easily identify between accounts within the service accounts table.
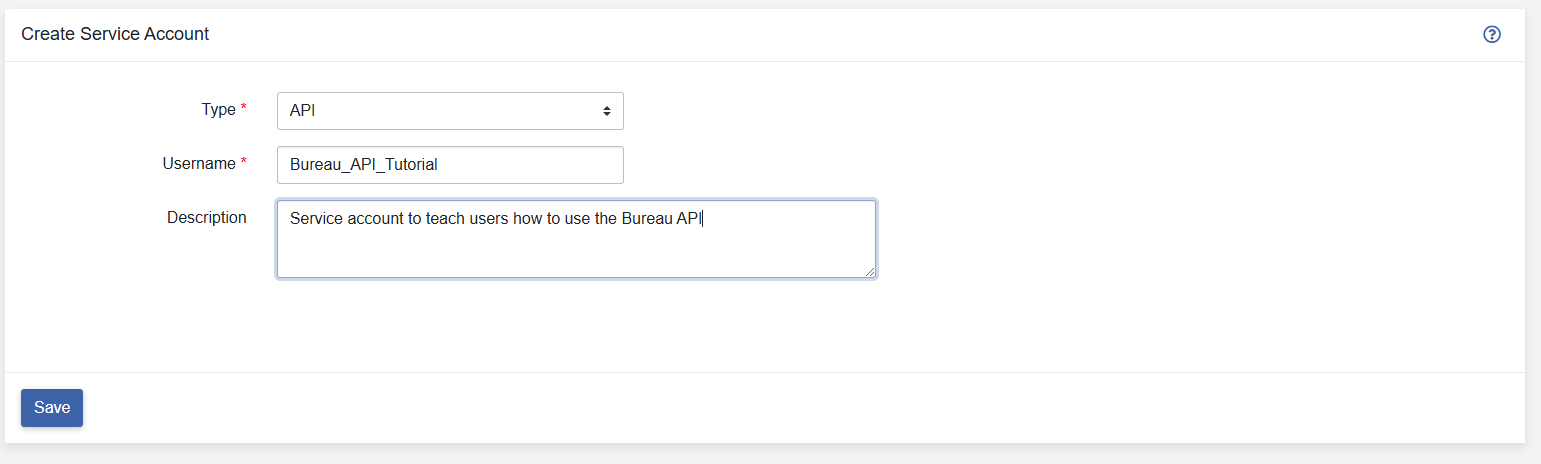
Clicking the “Save” button will create the Service Account.
N.B. You can create multiple API service accounts, providing you have available service account usage within your licence. This will allow you to grant the service user accounts different roles and permissions.
API Key
Following creation, the service account will be displayed within the service accounts table.
Clicking on the service account row will navigate to the “Edit Service Account” page, where the API Key can be revealed:
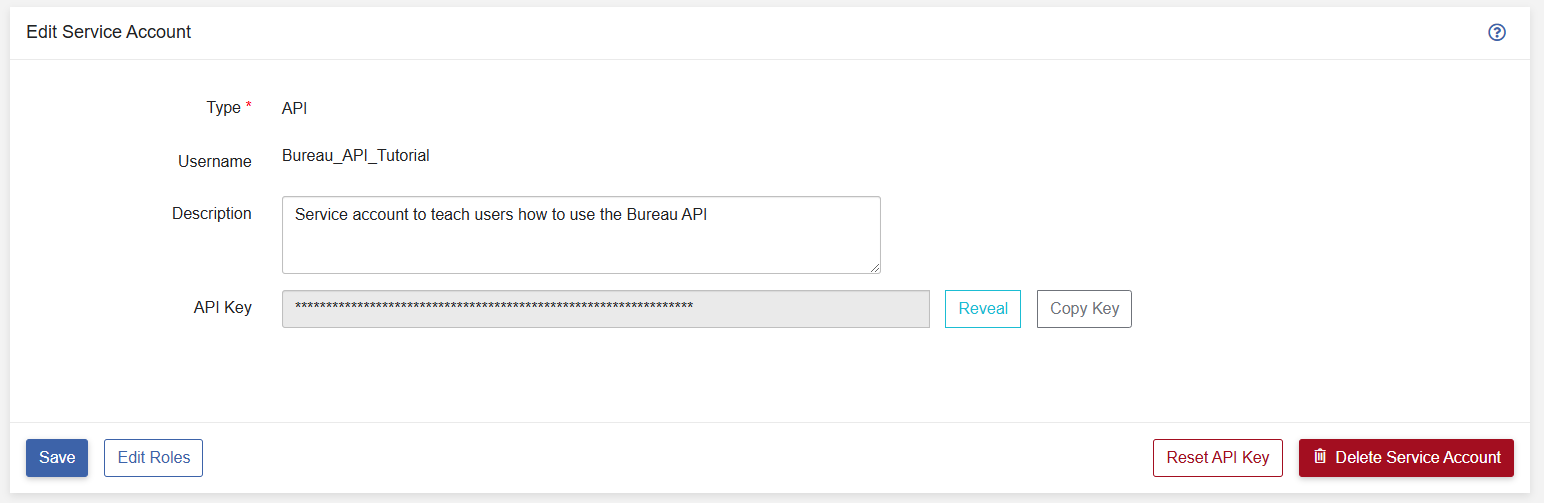
Clicking the “Reveal” button will display the API Key.
The API key can be copied to the clipboard by clicking the “Copy Key” button.
Clicking the “Edit Roles” button will navigate to a page in which roles and limits can be added to the service account:

This page, also allows the service account to be enabled or disabled (the service account is enabled by default). Individual Item, Submission and Approval Limits can also be set for the service account as per a user account.
User roles for the service account can be allocated on this page.
Step 3 - Group Settings
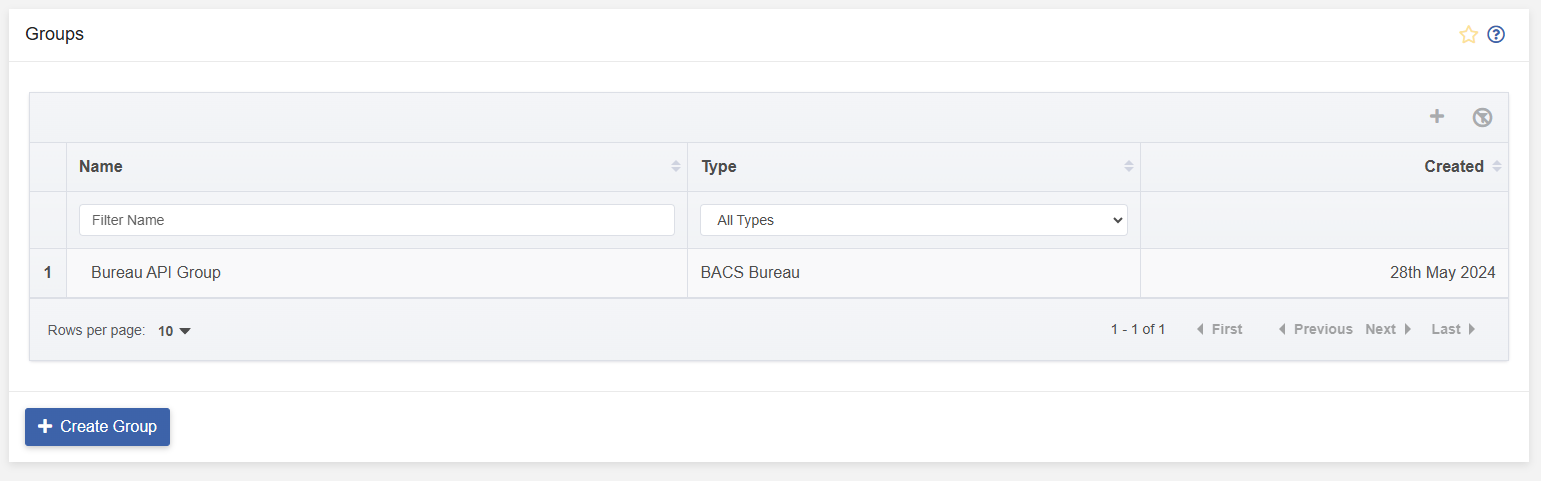
Following the creation of an API Service Account, it must be assigned to a group before it can be used. BACS Bureau or FPS Bureau groups may be used with the Bureau API. Creating/Editing Bureau Groups.
Navigate to the Groups table via Admin > Groups and then click on the row for the group to which the API Service Account will be assigned.
Signing and submission can only be performed via the API for HSM groups.
Group Users
For the API service account to be able to create and manage submissions for the selected group, the API service account needs to be added as a group user.
Navigate to the Group Users tab within the Edit Group page:
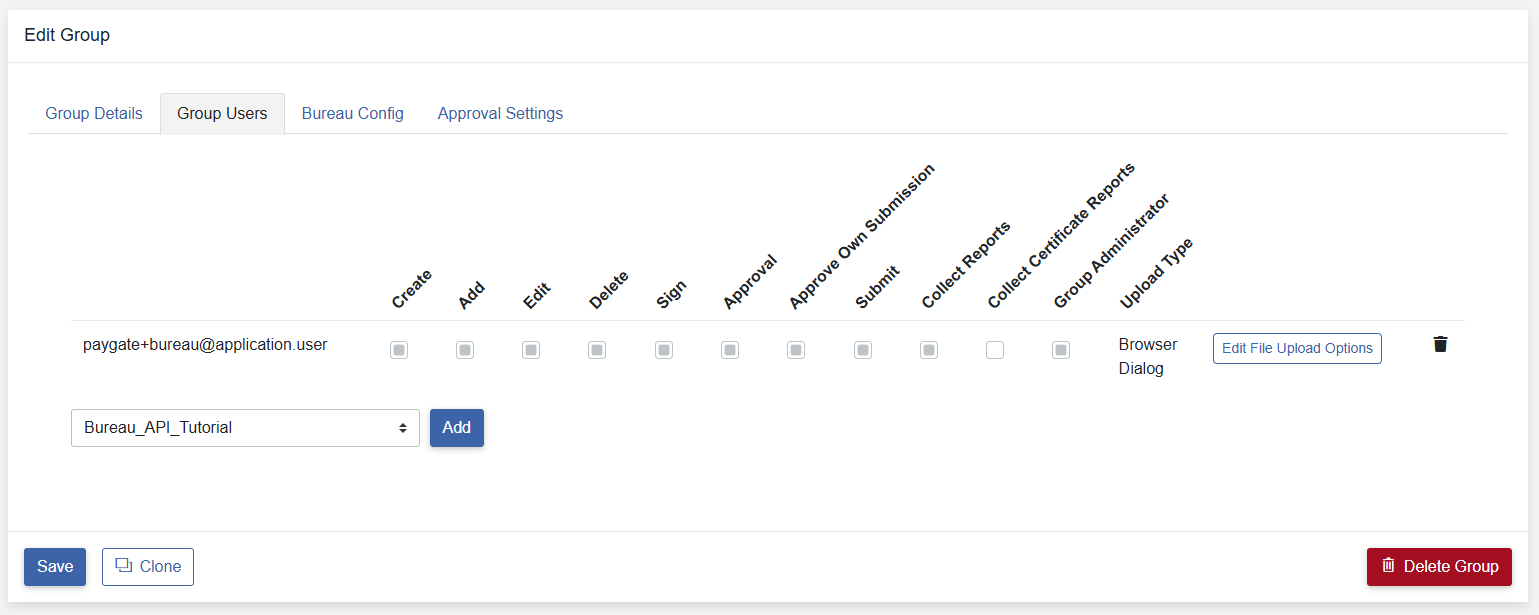
Select the API service account from the user selector and click “Add”.
Group User Roles
Once the API service account has been added to the group, group user roles need to be assigned to the API service account.
The group user roles will determine what the API service account is authorised to do within the API application for the selected group.
Create
The Create role is a fundamental role which not only allows the API service account to create and progress a submission but allows the API service account to view the submission and payment details, and to manage the status of the submission.
Add
This allows the API service account to add payments to a submission.
Edit
This allows the API service account to edit the details of a payment within in a submission. This role will be needed to correct any issues found during Pre-submission Validation
Delete
This allows the API service account to delete payments from a submission. This role will be needed to remove any payments that are no longer required within the submission.
Sign
This allows the API service account to sign submissions. This is only possible for HSM groups.
Approve
This allows the API service account to approve submissions.
Approve Own
For the API service account to approve submissions they have created, the Approve Own role is required.
Submit (Direct Groups Only)
The Submit role is only relevant to Direct groups and allows the API service account to send submissions to Vocalink. This is only possible for HSM groups.
Collect Reports
This allows the API service account to return the BACS and/or Faster Payments report lists and to download BACS and/or Faster Payments reports. This is only possible for HSM groups.
Group Administrator
For the Bureau API application, this role is not required.
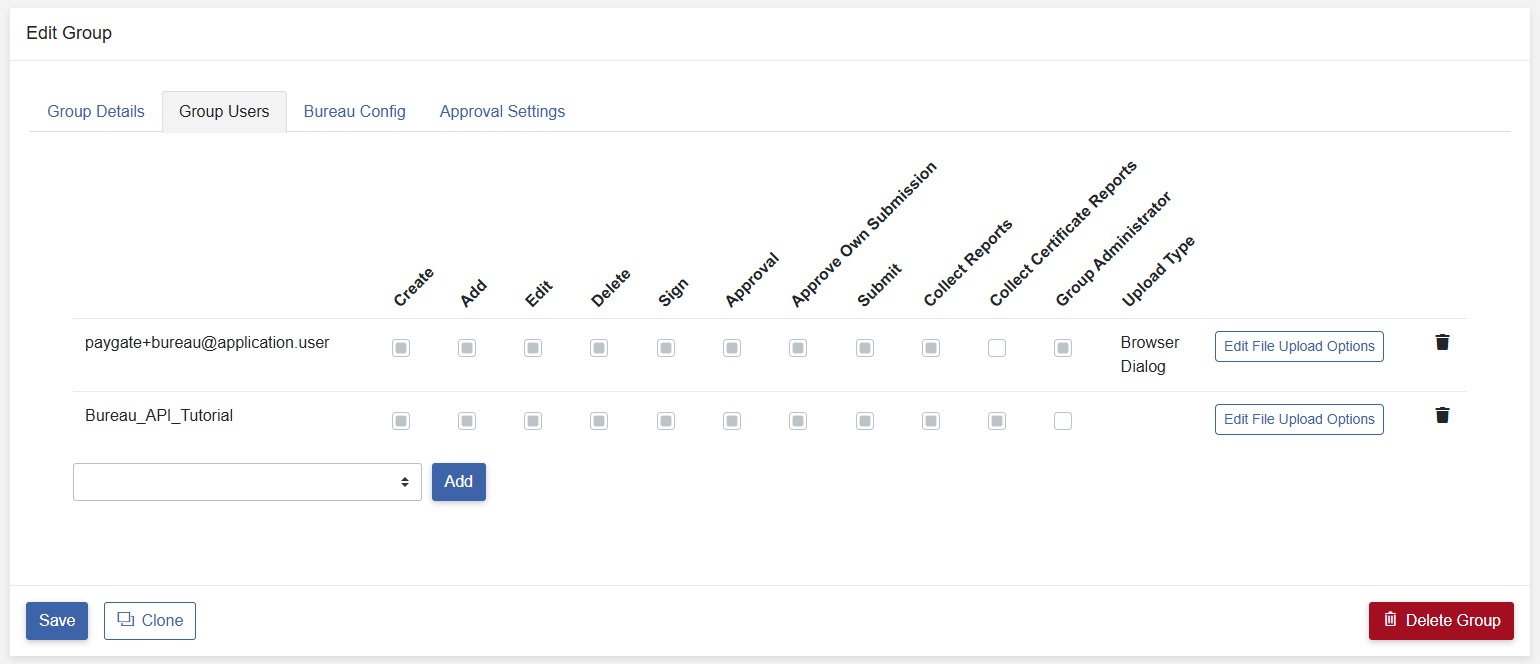
Tick each role that is required for the API service account and once all required roles have been assigned, click “Save”.
Step 4 – API Calls Within an Application
Following the configuration of the API Service Account and Bureau Groups, the API can be integrated into applications.
Testing
Tools such as Insomnia or Postman can be used to test the API before developing an application.
Authorisation and Tokens
An OAuth2.0 access token needs to be created using the following configuration settings.
- Security Scheme Type: OAuth 2.0
- Grant Type: Client Credentials
- Access Token URL: https://api.paygateservice.com/identity/connect/token or https://api.paygateservicedemo.com/identity/connect/token
- Client ID: paygate_api
- Client Secret: API service account API Key
This token must be included in each request to the API.
API Calls
Documentation for Bureau API calls are detailed in the Bureau API Documentation via the Developer Portal (API Documentation > Bureau API).
Each API call will perform checks against the licence, API service account and group user role permissions on being sent.
If the API service account does not have the required group user role or permissions to perform the call, the Bureau API will report this within the response and will not complete the requested call.
API Call Example
Bureau API Submissions depend on operations based around three concepts:
- Customers: holding the contact and bank account details for the commercial entities that receive payments.
- Jobs: define repeatable submissions based on a predictable collection of files.
- Submissions: Collections of payment blocks containing multiple transactions that will be submitted to BACS.
Submissions and Jobs are dependent on Customers. To retrieve a list of Customers can be performed using the following api endpoint:
Call type: GET
URL: https://api.paygateservicedemo.com/bureau_publicapi/api/v1/bureau-customers/
RESPONSE:
{
  "success": true,
  "messages": [
    "Operation Successful"
  ],
  "customers": [
    {
      "name": "John Smith Business",
      "contactFirstName": "John",
      "contactSurname": "Smith",
      "customerAddress": {
        "line1": "15 High Street",
        "line2": "Fictional Business Park",
        "line3": "Fictional Area",
        "line4": "Fictional Area",
        "locality": "Fictional Locality",
        "postcode": "AA1 1AA",
        "town": "Fake Town",
        "county": "Fake County"
      },
      "telephone": "01234 567890",
      "telephone2": "01234 567890",
      "websiteUrl": "https://www.johnsmithsbusiness.fake/",
      "emailAddress": "johnsmith@johnsmithsbusiness.fake",
      "serviceUserNumber": "100000",
      "paymentLimit": 10,
      "submissionLimit": 10.5,
      "deleted": false,
      "contraNarrative": "CONTRA",
      "bankName": "Trusted Bank Plc.",
      "sortCode": "101010",
      "accountNumber": "10101010",
      "createdDate": "2019-08-24T14:15:22Z",
      "modifiedDate": "2019-08-24T14:15:22Z",
      "defaultImportSchema": "Mapping",
      "defaultImportMapping": "Your Mapping",
      "defaultImportFilename": "Filename.txt",
      "tags": "TAG1",
      "bankReference": "SMITH123",
      "bankAddress": {
        "line1": "15 High Street",
        "line2": "Fictional Business Park",
        "line3": "Fictional Area",
        "line4": "Fictional Area",
        "locality": "Fictional Locality",
        "postcode": "AA1 1AA",
        "town": "Fake Town",
        "county": "Fake County"
      },
      "customerId": "1b2bd9d9-c50d-4c5f-950c-bc62a8e20ead",
      "reference": "YOURCUST001",
      "customerUrl": "/api/v1/bureau-customers/1b2bd9d9-c50d-4c5f-950c-bc62a8e20ead/",
      "notesUrl": "/api/v1/bureau-customers/1b2bd9d9-c50d-4c5f-950c-bc62a8e20ead/notes",
      "jobsUrl": "/api/v1/bureau-customers/1b2bd9d9-c50d-4c5f-950c-bc62a8e20ead/jobs",
      "submissionsUrl": "/api/v1/bureau-customers/1b2bd9d9-c50d-4c5f-950c-bc62a8e20ead/submissions"
    }
  ],
  "count": 1,
  "currentPage": 1,
  "totalPages": 1
}