Tutorial - A Simple Mapping
Overview
In this tutorial we’re going to create a full mapping from start to finish. We’ll start by creating an importer and then we’ll use the importer in the Mapping Designer. Lastly we will test our new mapping from within the designer to see the results of our work.
In this tutorial we will take a simple comma separated (CSV) file and build a mapping to take the data and import it into a BACS submission.
Prerequisites
There are a few prerequisites for building this mapping:
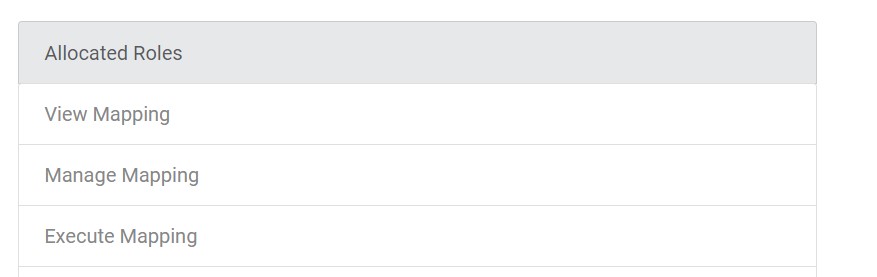
1 - Access to Paygate - obviously 2 - The sample file that we are going to map. Download it from here. 3 - A Paygate user account with the following user roles: View Mapping, Manage mapping, Execute Mapping.
Step 1 - The Importer.
All mappings need an importer. the import is the part of the process that reads the file, cleans it up (if required) and adds meaning to the various data fields in the file.
In our example we will use a CSV file. CSV files have been around for a long time and show no signs of going away any time soon.
Create the Importer
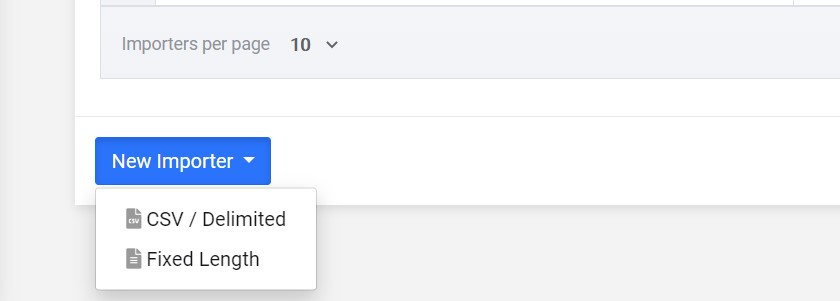
Log into Paygate and using the menu navigate to Automation > Mapping > Importers. This opens a table of Importers that are currently loaded into Paygate. If you are a new Paygate customer then the table will be empty.
At the bottom of the table click the blue button marked ‘New Importer’ then click ‘CSV / Delimited’
Hopefully you are now in the the ‘Create a CSV / delimited importer’ page. If not or you see an error message, check that you have the correct user roles - see above.
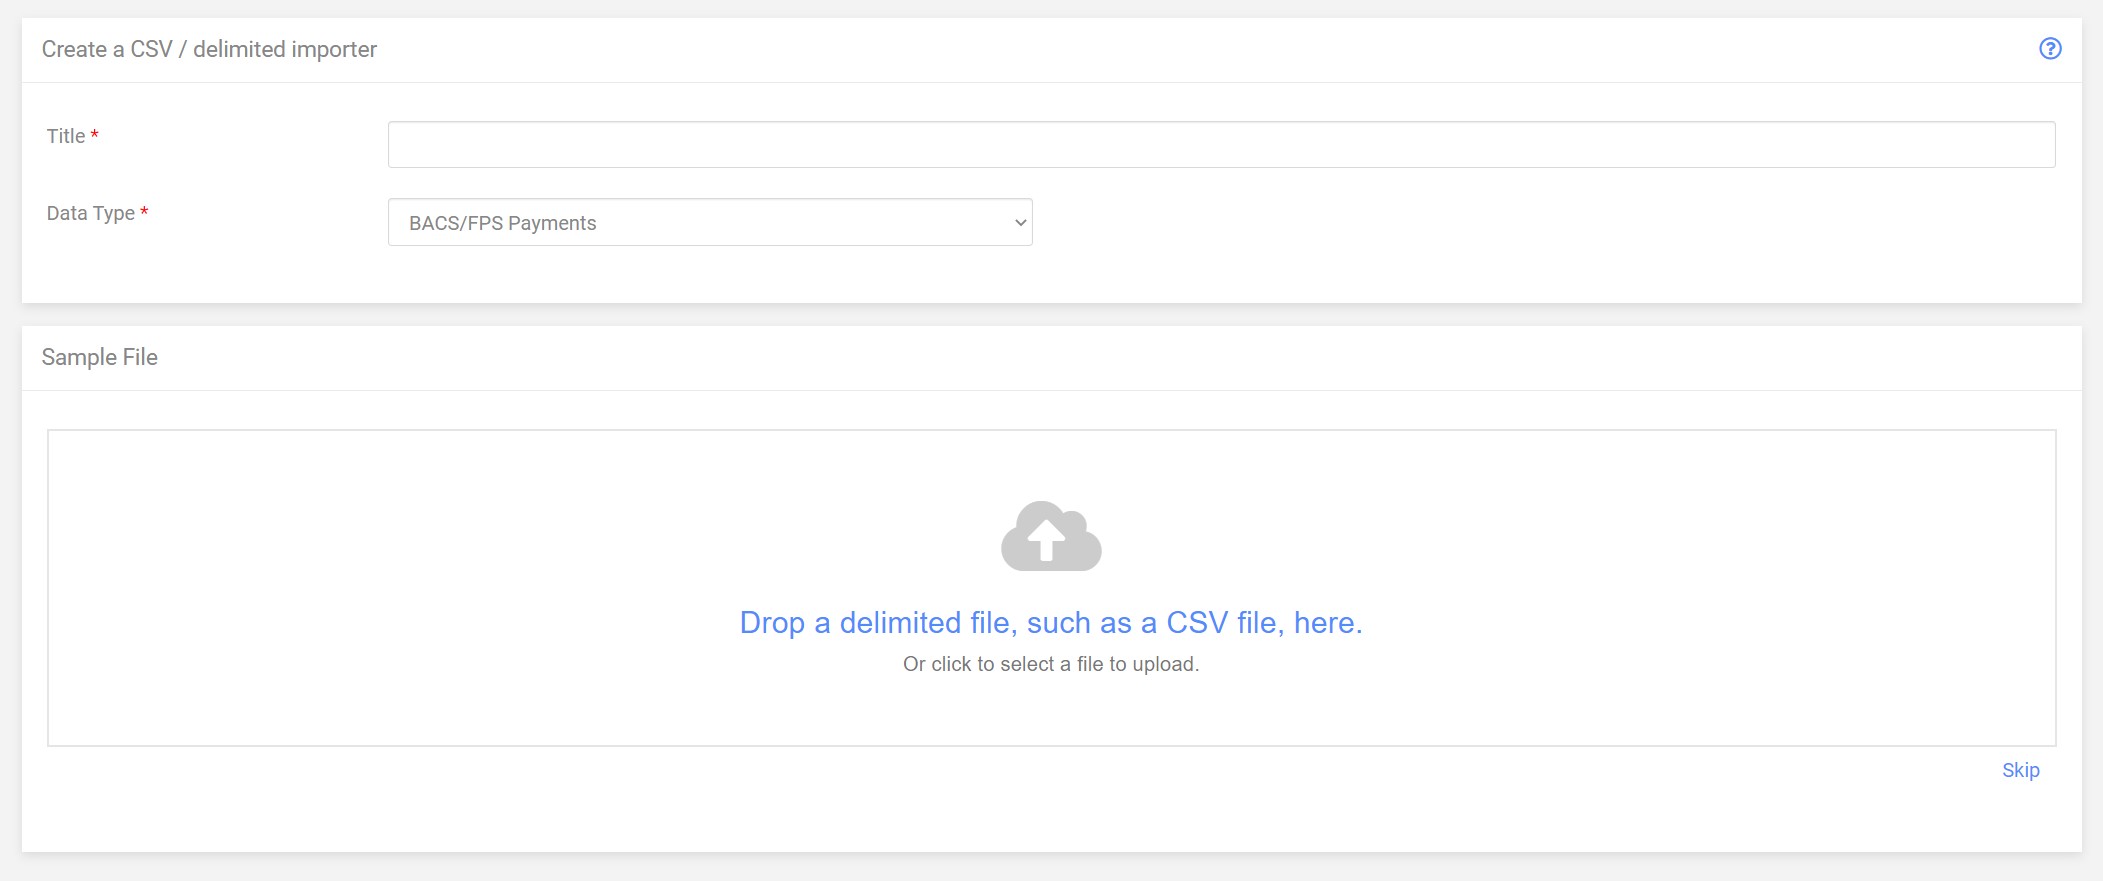
Title
Give the new importer a title. You’ll want to choose a good title that concisely describes the use. In this tutorial the data file contains vendor payments from the company’s accounts package. Let’s call the importer ‘Vendor Payments’.
Data Type
You can leave the Data Type as the default ‘BACS/FPS Payments’.

Reading the sample file
Now you need to ‘tell’ the importer about the file format. CSV files can be automatically parsed in Paygate and the system will make an attempt to understand the different parts of the file.
Take the sample file vendorpayments.csv and drag it into the box marked ‘Drop a delimited file, such as a CSV file, here.’
The import has read the file and inspected the format. It will have made a good attempt to understand the file but there are limitations.
The system can spot an account number but it is unable to determine if it is your account number or the vendors account number. In actual fact the account number in the file is the vendor account number and so we’ll have to make a few edits to complete the importer.
File Parameters
You can keep the default settings. The system has determined that the file did not have a header. In your own importers you can use this section to find tune how Paygate will read your own files.
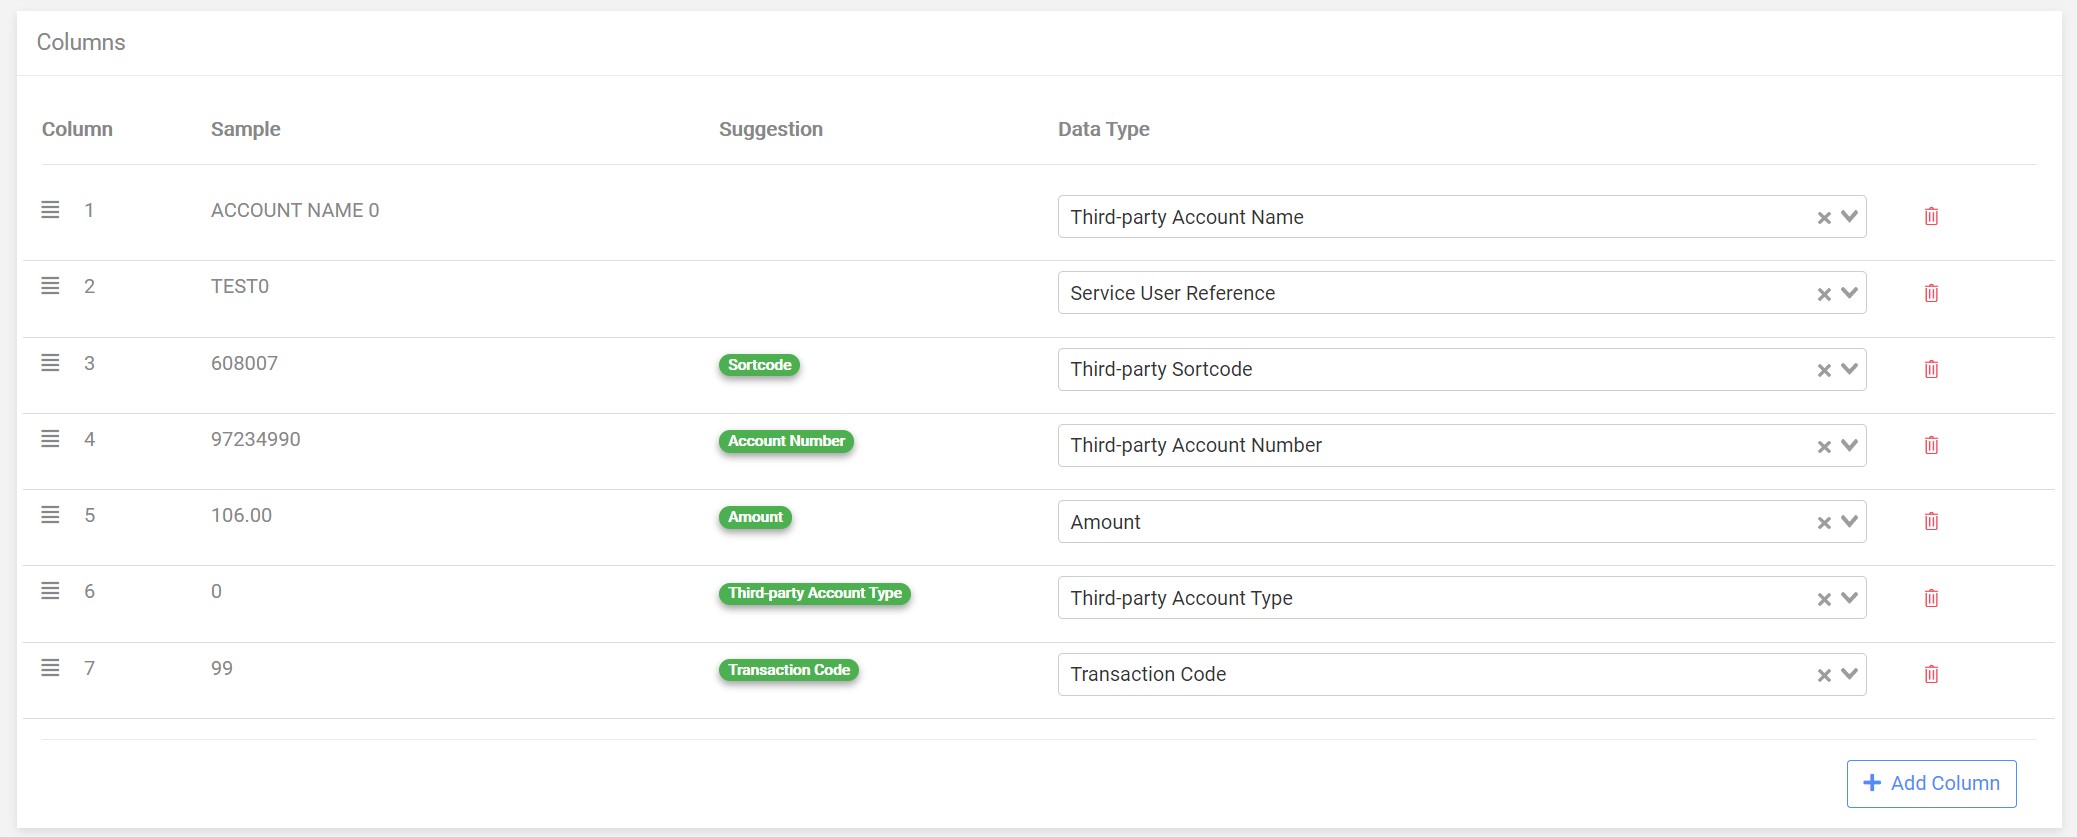
Columns
Paygate has made a good attempt at determining the columns of the CSV file. It made a correct guess for the Amount, Account Type and BACS transaction code.
It knows that column 3 is a sort code but you need to tell it that it is the vendors sortcode - in BACS this is known as the Third-party Sortcode.
For column 3 change the Data Type to Third-party Sortcode. For Column 4 change the Data Type to Third-party Account Number.
For column 1 and 2 the system was unable to even make a guess. There is not enough information and rather than make a wrong guess and confuse matters, it decided to leave out a suggestion. For these columns we need to use our knowledge of the file format to tell the importer what they are.
For column 1 change the Data Type to Third-party Account Name. For column 2 change the Data Type to Service User Reference.
Save the Importer
That’s all we need to do for the Importer. Click the blue ‘Create’ button to save the new importer in Paygate.
Moving Onto the Mapping
Now we have the importer we can create the mapping.
Open the Mapping Designer by navigating the menu: Automation > Mapping > Mapping Designer. This opens a blank mapping.
Adding the Importer from step 1
Using the Mapping Designer Menu bar at the top of the Mapping Designer click the ‘Nodes’ menu. Now click ‘Importer’.
We named the importer, from step 1, Vendor Payments. Find the Vender Payments Importer in the select box.
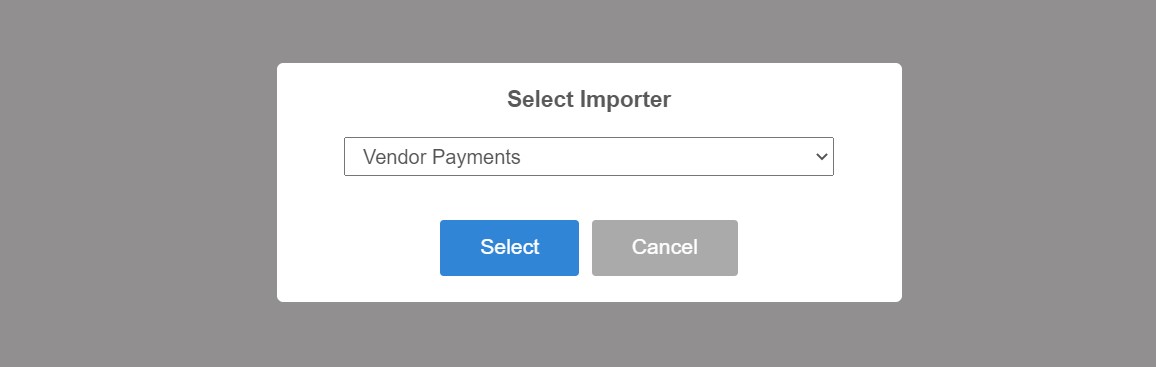
Click ‘Select’ to add the importer to the mapping.
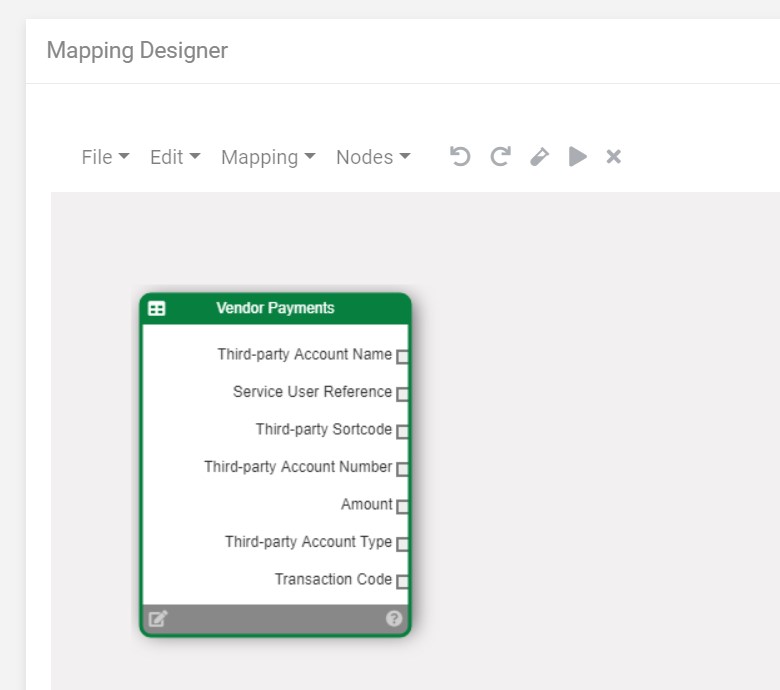
We’ve just added the importer to the mapping diagram. Note the output connectors down the right hand side of the ‘node’ are the same as the columns that we defined when creating the importer. When the mapping runs the importer scans through the file, row by row and outputs each element of the file to the correct output of the importer node.
Add a BACS Connector
We want to convert the file into a format that can be used by BACS. So we need to add a Payment Connector to the mapping. From the ‘Nodes’ menu select ‘BACS / Faster Payments’. Keep the default ‘ BACS Connector - Destination’ and click ‘Select’.
The Payment Connector is added to the mapping. The new node will drop on top of the existing Importer node. Click and hold the red header bar of the BACS Destination connector and drag to move it to the right of the Importer.
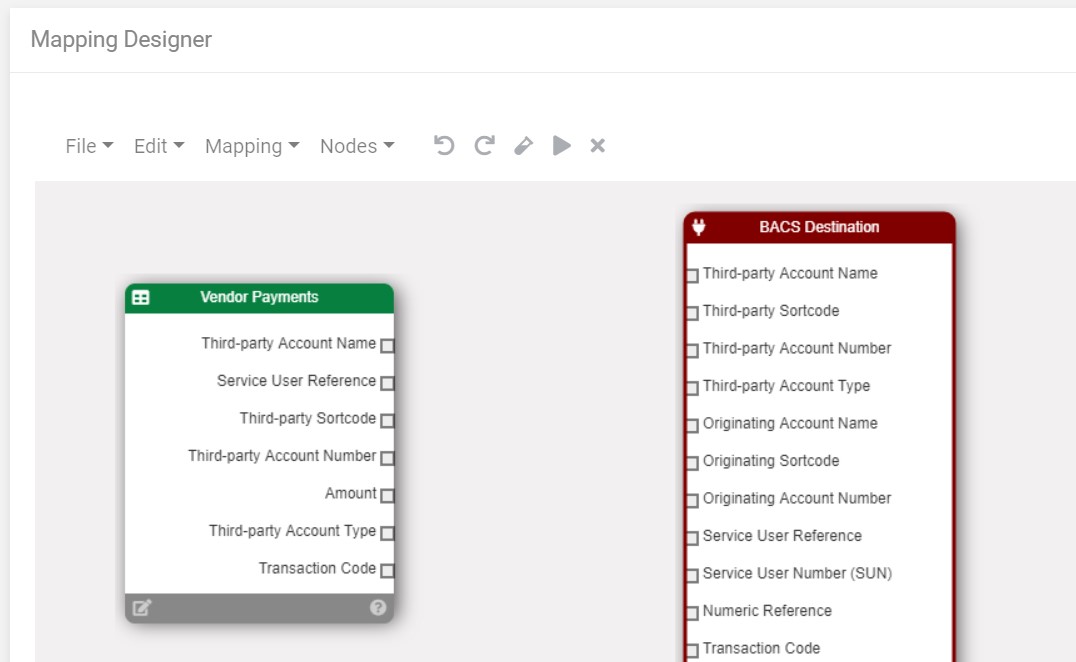
If data is mapped to the BACS Destination connector then many parts of Paygate will be able to read the data - regardless of the format of the originating file. This is how Paygate will be able to read the ‘vendorpayments.csv’ file - because we are, in effect, training Paygate what the fields in the file represent.
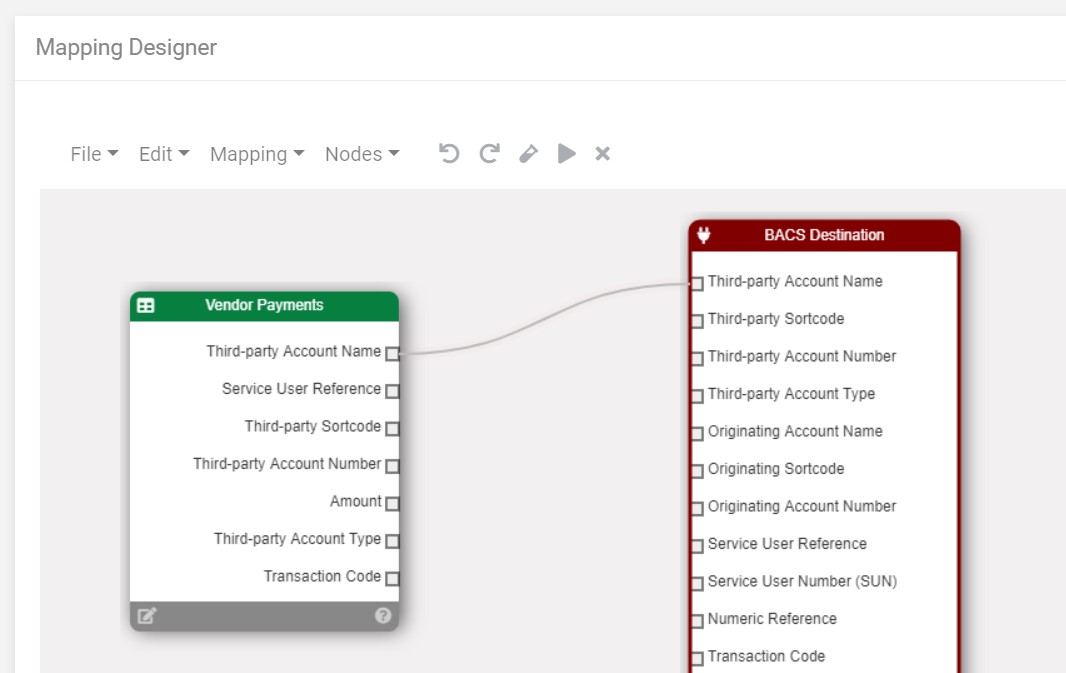
To connect the importer node to the BACS destination node we draw links between the data fields.
Move the mouse over the output connector on the importer named ‘Third-party Account Name’. Click and hold the mouse button. Now with the mouse button still down, drag a link from the importer to the ‘Input’ of the BACS Destination node marked again with Third-party Account Name. Now let go of the mouse button to create a permanent link.
You build an entire mapping my linking the fields in the import to the fields in the BACS Connector.
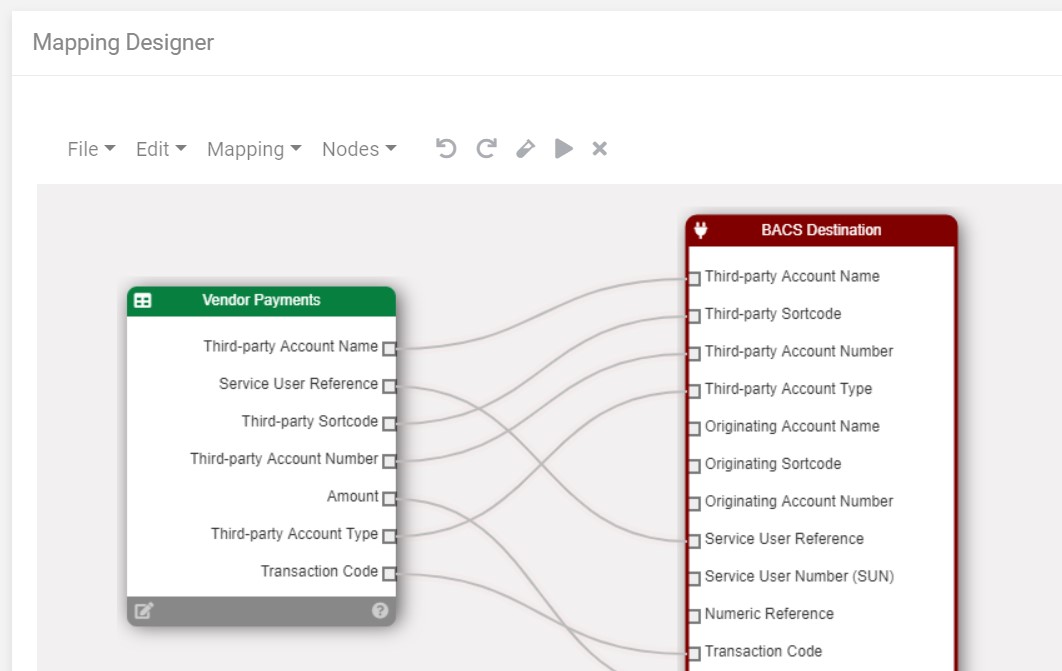
An easier way to create the links
There is a much easier way to complete the mapping. When we created the importer and set the data-type of each field - we can make use of auto mapping.
From the menu, click Mapping and select ‘Auto-map’. Like magic, Paygate will complete most of the rest of the mapping for you.
Mapping - final steps
Auto-mapping completed most of the mapping but we still have a few more steps to do. We need to add the originating bank details. The details were not contained in the original file and so they were never imported and so not available in the mapping.
The originating bank details will be the same for each payment instruction and therefore they have constant value for all payments. One way to add constant values to a mapping is to make use of the ‘Constant’ node.
Adding the Bank Constants
From the ‘Nodes’ menu click ‘String Operators’ and choose ‘Constant’ from the select box. Move the constant node to an empty part of the mapping.
You can store any value in a constant and then link it to your payment connector for use in a mapping. This allows you to mix dynamic data in fields with constant (static) data in a mapping.
Click the cog icon on the constant. Enter a value fot eh sortcode and click Save.
Now link the constant output to the ‘Third-party Sortcode’ input on the BACS Destination connector. When the mapping runs the constant value will be added to this field.
Create two more constants and give them values for the Originating Account Number and Originating Account Name. Link these new constants to the respective input nodes on the BACS connector.
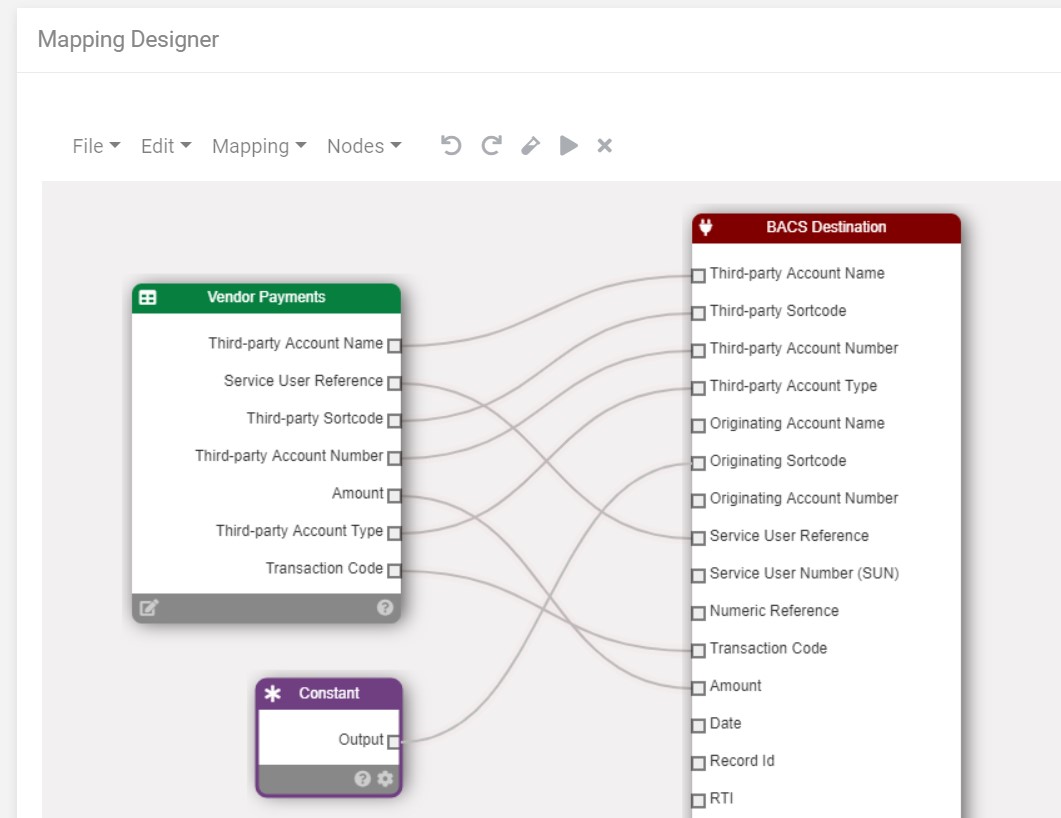
That was the final part of the design of the mapping and so the mapping is complete.
Save the mapping
You can save the mapping by clicking ‘Save’ in the File menu. Like the Importer, give the mapping a meaningful name - you can use the same name as the mapping if you like. I called my mapping ‘Vendor Payments’.
Once saved you can load the mapping back into the mapping Designer and make any changes to it.
Testing the mapping
To test the mapping you need to have the original csv file uploaded into the secure Paygate environment. You can use the Paygate agent or an sFTP server to do this.
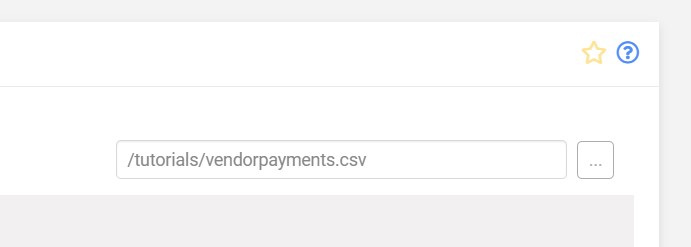
To test the mapping we will tell Paygate to run the mapping from within the designer using a sample file. In the top right of the mapping designer you will see the file path text box.

Click the browse button to open the file browser. Locate the file and double click it. The file path will be shown in the file textbox.
Find the ‘Test the Mapping’ button in the Designer Toolbar. It looks a bit like a play button.

Click the button to run the mapping with the selected file.
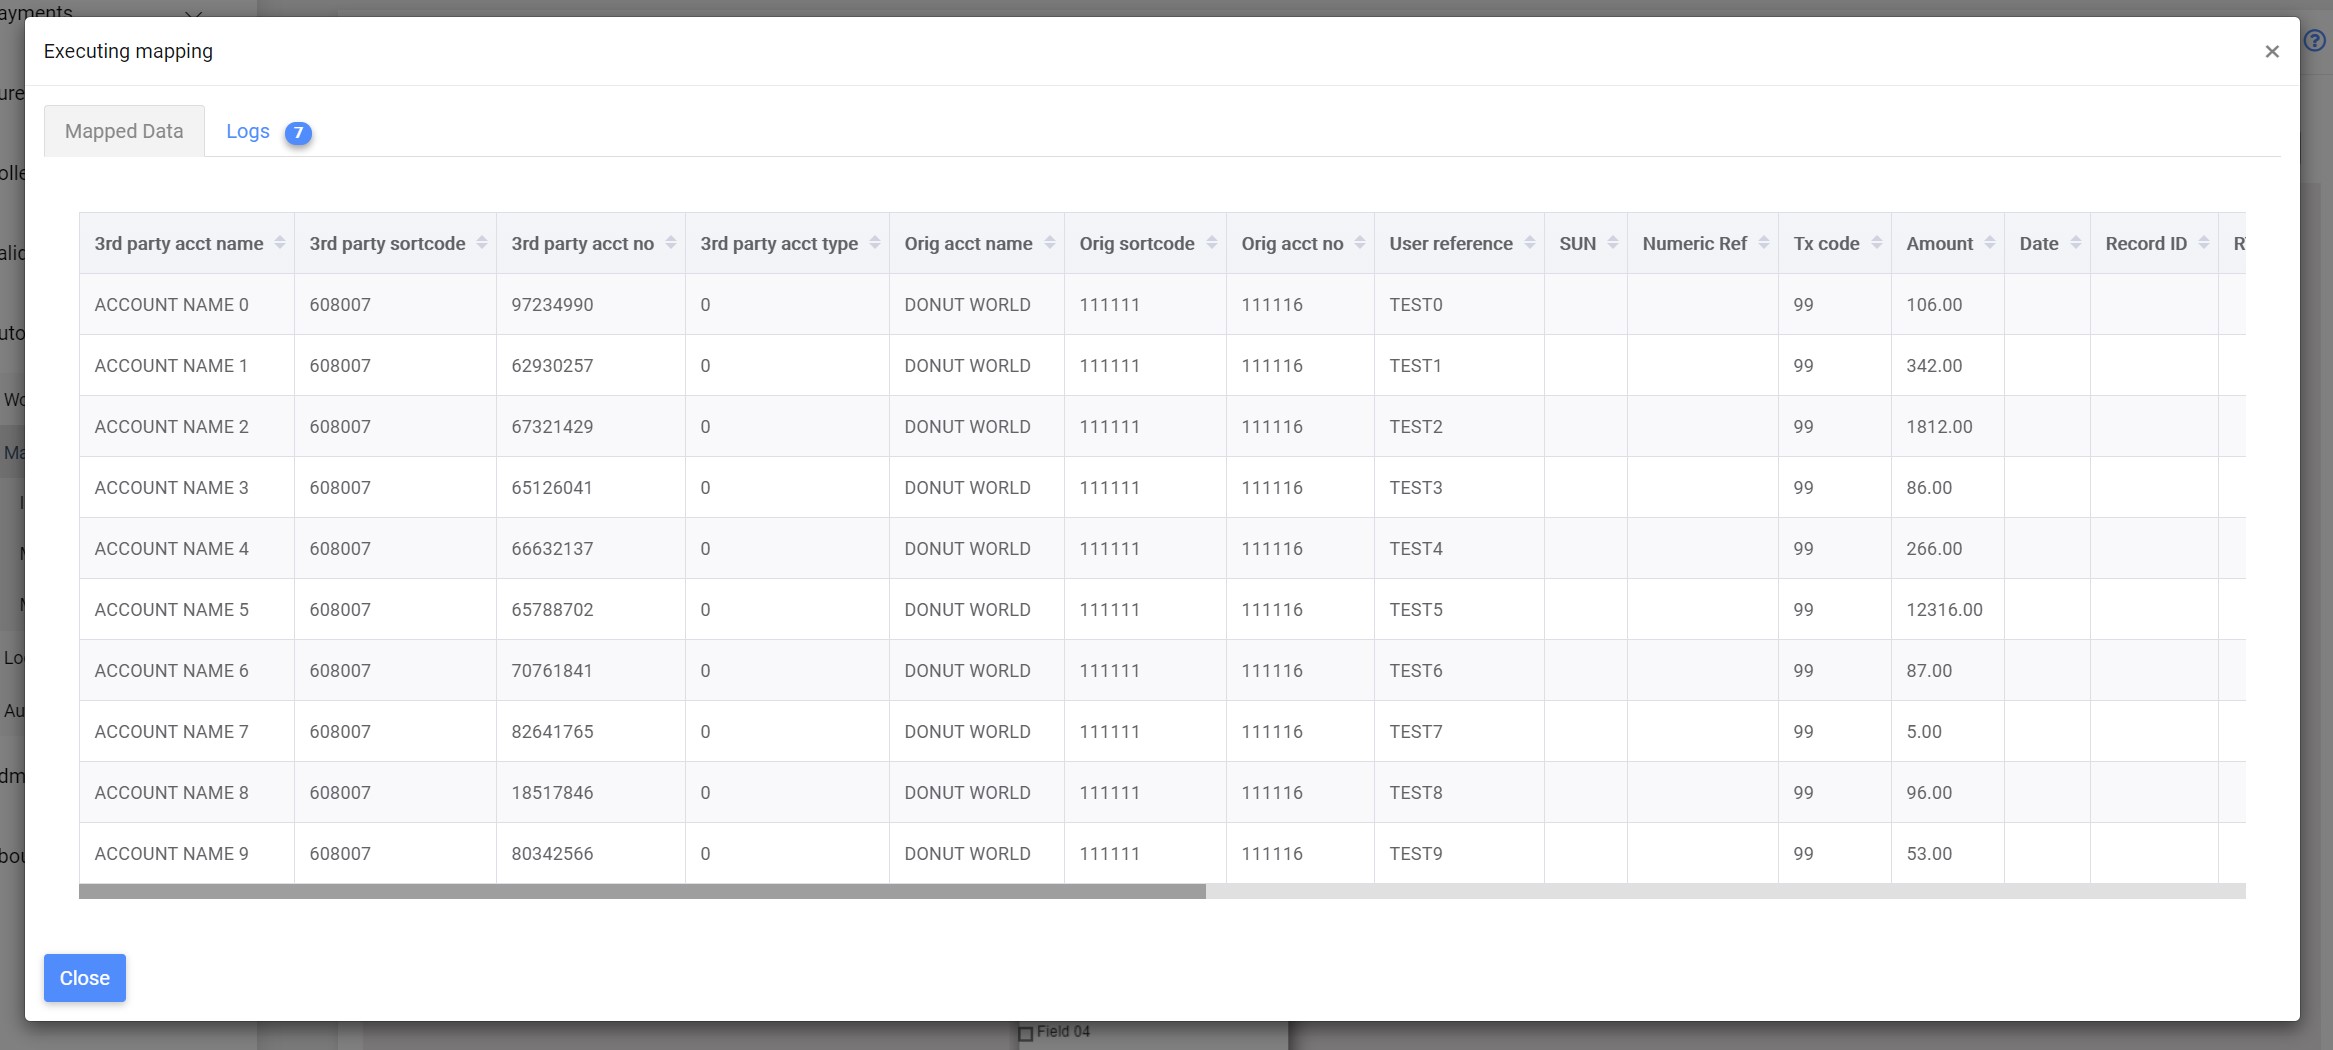
When you run a mapping in this way, no data is actually stored in Paygate. It’s just for testing. Hopefully you will see the results of all of your hard work. You should see the data from the file neatly mapping into the correct columns.